www.motorbikeadventures.co.uk headlight reflectors halogen bulbs HID light reflectors HID conversion (55 watt) fitting your own HID 'www.motorbikeadventures.co.uk' 'headlight reflectors' 'halogen bulbs' 'HID light reflectors' 'HID conversion (55 watt) 'fitting your own HID'
Installation
Fitting to Motorcycles
When fitting to bikes, do it in 3 separate steps
(1) Remove the headlight unit and do the fiddling around with the burners that way. Trying to fit the new burners without removing the headlight unit is a recipe for frustration swearing and skinned knuckles – and therefore misery. You will also need a 23-25 mm (1 inch) drill bit (you need to make a circular hole on the back of the headlight units two round caps.)
(2) Find where you want to locate the ballasts, and mount them – make sure they are close enough to the headlights for the cables to reach – it’s near impossible to extend them Others have chosen different locations. There is no best answer. But do note that if you mount under the oil cooler on a GS or GSA, the forks “move forward” under compression, so the ballasts cannot project further back than that rear edge of the oil cooler. Some end up getting custom brackets made up for the ballasts, while my preferred option now that we have moved exclusively on to ultra-thin ballasts, is just to mount them with 3M VHB (Very High Bond) double sided tape or 3M VHB Dual Lock industrial Velcro or a small bracket that comes with the kits or cable ties. Everyone seems to find different locations to mount the ballasts and many ways to hold them in place. You have to be creative with motorbikes re ballasts mounting. There is always room though.
(3) Connect everything up. And power up !
Note that sometimes the kits come with slightly different wires that are nominated in the installation booklets. The booklets refer to red being positive and black negative. Usually that’s the case with the kits but occasionally I get kits with blue and black wires. In those examples, the black wire remains negative, and the blue wire is positive.
Here it is again in a bit more detail:
HID Conversion Kit Installation, for BMW motorcycles.
1. Remove Headlight unit from motorcycle, ensuring motorcycle is switched off. No need to remove battery.
2. Unscrew the plastic caps at the back of the housing that provide access to the bulbs.
3. In the centre of the two plastic caps that were removed earlier, drill a 23-25 mm (1 inch) hole (with a hole saw bit or a flat wood bit).
4. Unlatch the bulb retaining spring clip, and remove the old halogen bulbs. The plastic that holds the spring clips is brittle and prone to break. Be careful.
5. Pass the bulb and two wires with open spade connectors through the newly drilled out hole in each plastic cap until the rubber grommet is seated in the newly drilled hole.
6. Insert new HID bulbs, ensuring they are correctly aligned. Note that the 4 wires will slide back and forwards through the grommet. I advise that when you are fiddling around getting the bulb in, that you pull as much wire to the bulb side of the grommet as possible to avoid skinned knuckles and excess frustration. When seating the new bulbs, the H1 is hard to get wrong, but the H7 is easily gotten wrong. Make sure the bulbs are correctly seated before closing the bulb retaining spring clip, again taking care not to damage the poorly made housing around the base of the spring clip.
7. Connect the spade connectors up to the motorcycle’s headlight power. (see 8 and 9 below for H7 and H1 respectively)
8. The spade connectors attach to the contact block that previously plugged into the back of the bulb. On a H7 kit, the brown BMW wire (negative) needs to lead to the black spade connector wire (negative). And the white or yellow BMW wire (positive) needs to connect to the blue or red spade connector wire (positive).
9. On a H1 kit, the BMW earth is plugged to the headlight housing and needs to be removed before connecting to the black spade connector. They may need to be crimped together with a pair of pliers if they are different shapes. The wire that connected to the H1 bulb is the positive and needs to be connected to the blue or red wire’s spade connector.
10. Plug the wires that come from the bulb into ballasts with the “its impossible to plug in the wrong way” connectors and check the HIDs have been wired up correctly by turning the appropriate lights on. Note both ballasts in the kit are identical, so you do not need to pair a particular ballast with a particular bulb.
11. Close up the headlight unit by screwing back in the plastic caps. Note that the 4 wires will slide back and forwards through the grommet. It is advisable to pull out excess wire from the headlight housing as you close the unit, to avoid having too much crowded wiring inside the cramped headlight housing. Similarly, I advise that when you are fiddling around getting the bulb in, that you pull as much wire to the bulb side of the grommet as possible to avoid skinned knuckles and excess frustration.
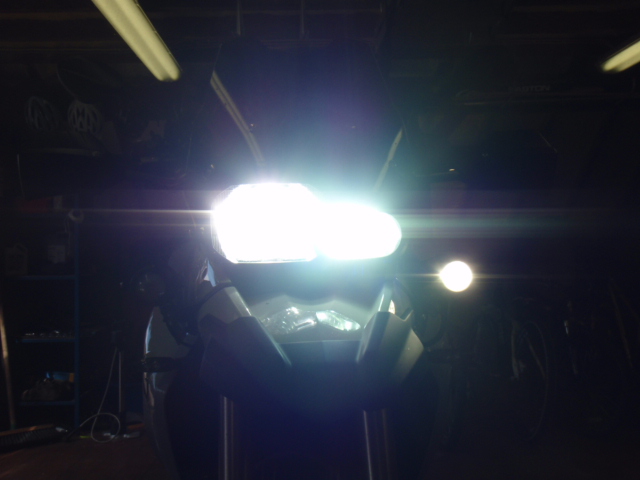
12. Next stage … mounting the ballasts. It’s really up to each individual to mount ballasts and a number of different brackets and locations are possible. Make sure the ballasts are mounted so that their cables can comfortably reach the appropriate bulbs. The ultrathin kits are can be screwed or the supplied brackets or cable ties used or otherwise attached to a flat clean surface. Increasingly, my mounting of choice is to use 3M double sided tape or Dual Lock industrial Velcro or cable ties unless they come with small brackets that can be bolted on to a inside fairing etc. See below for more info on industrial Velcro, and note the first 3 pictures have Ultra Thin HID ballasts attached with Dual Lock industrial Velcro or a bracket and cable ties.
Note: BMW’s have unique wire colors.
White wire : high beam positive
Yellow wire : low beam positive
Brown wires : earth (negative)
Ballast location examples
In the photo above, the two headlight ballasts are attached to the top of the headlight unit using nothing but small patches of Dual Lock with the picture on the right and bottom having the ballast units on a custom bracket. On most bikes ‘more on a GS’ there is space either side of the front forks and cable tying the ballasts in is my preferred method.
Fitting
If you don’t fancy fitting your own HID set, we can fit your HIDs to your headlights.
Note that we do not claim to be legal experts and can give no advice as to the legality of operating any HID conversion (55 watt) or any other lighting modification due to the widely varying road regulations in different regions and countries. Anyone who does claim to be able to give you any definitive answer is talking through his/her hat. As with any aftermarket accessory, its up to the buyer to
Note: Some headlight reflectors designed for halogen bulbs do not react well to the HID light and occasionally after prolonged use, some marking of the reflectors may occur. Fitment of HID conversions and any associated after-effects are solely the responsibility of the buyer.
If you have any questions please email info@motorbikeadventures.co.uk
Have a look at our website we specialize in heated clothing and Motorbike Intercoms.
www.motorbikeadventures.co.uk